Thursday, January 23, 2014

3rd Marking Period


Assignment 21A,B,&C 


We started off the marking period using Sketchup which is a program where we can make shapes into 3D models. Since it's a new program, we started practicing by making 3 basic shapes, a triangle, circle and square, that was assignment 21A. In assignment 21B, we drew the shapes again but this time, we made it 3D by using the push/pull tool. Lastly, in assignment 21C, we wrote our names by using the pencil tool and then used the push/pool tool to make our name look 3D.

Assignment 22        


 In assignment 22, we used Sketchup to design twelve different kinds of 3D blocks. With the help of the pencil tool, and measuring tape tool, we were able to create twelve different blocks. We had were given a paper with twelve blocks on it and we had to count the little squares in it in order for us to know how long, wide, and tall the blocks were. We used the rotating tool to rotate the drawing once we were done with one side of it. After we connected all the end points, we were given the chance to fill in our blocks with any color we choose to use.

Assignment 23


Since the holidays were arriving, we chose to use our Sketchup skills and make a gingerbread house. Using what we knew about making the 3D blocks, we made the house and added the door and window to it. When we were done adding those house features, we then drew out the candy by using the circle tool and coloring it with the same colors the pictures has.

 Assignment 24


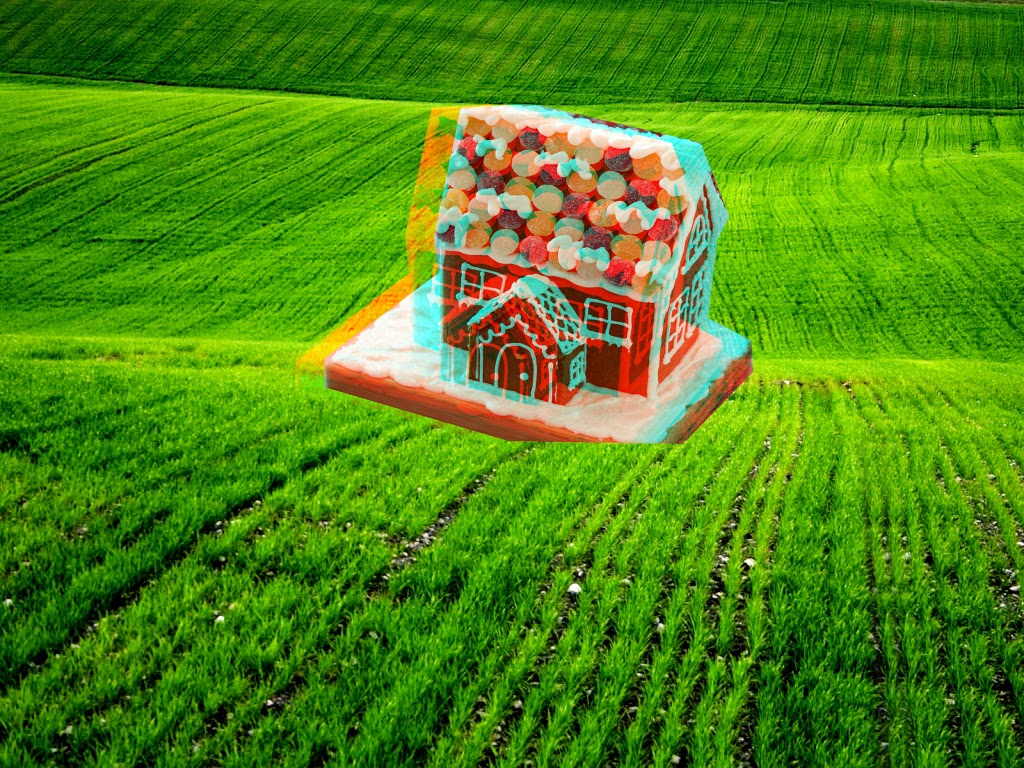
 In assignment 24, we made the gingerbread house into a 3D picture. First, we had found any outdoors background so we can be able to put the house outdoors. Then, using the magnetic lasso tool, I cut out the background of the picture so that the house can be on its own. Then, we created a copy of the gingerbread house layer and renamed it 'Red'. Once we renamed it, we had to change the RGB setting to only the color red. Then, we changed the original layer to all the colors but red. Finally, we moved original layer a little bit to the right and created a 3D affect. You can only see the 3D with red and blue 3D glasses.
 

QUIZ!

What is a gif?

- A gif is a form of a picture that moves like an animation because it has frames. A gif is like a little movie with no sound.

 Assignment 25


 In this assignment, we created a gif. A gif is a picture that moves due to the number of frames it has the amount of seconds each frame has. We had to make a power button into a gif. We drew 2 ellipse circles, one smaller than the other, and made one black and the smaller one into a gradient edited color. Then we took the picture of a power button symbol and changed its blending options in order for it to be green. Once we had those things done, we created frames for the power symbol. We created 14 frames and made each frame repeat with no delay. Once we were done, we saved it as a gif and made it repeat forever.  

Assignment 26


 In our final assignment, we used photoshop to create a showcase room. We had to use guidelines to know how deep long, wide and tall the walls, floor and ceiling were. Then we created gradient backgrounds for them so they can look like a box. After we were done with the rooms, we created lights by using the ellipse tool and changing the blending options. Then, we created a smaller ellipse so we can make the lights. After that, we had to copy the layers so we can have 3 lights. Then, we used the ellipse tool to make the light seem as if it's really shining. We made one on the wall and on the floor. We changed the background to white and changed the opacity to make it have a faded, light-like color. After we were done with the showcase, we chose whatever we wanted to show and I chose the gold iPhone 5S. I used the magnetic lasso tool to delete the outside context of the picture and transformed it into the size that it was needed to be in the showcase. I got a picture of the front, side and back view in order for the showcase to look real.


Assignment 27


In our last assignment, we created a brochure about our classes this semester. We opened publisher and chose a brochure template that we liked. Since the brochure is divided in 3, for page 1, we chose the first column, from left to right, to write down our 1st and 2nd period class and describe what happened in them. The middle column was for our MTA info, meaning a description about our train ride to school and what trains we take. The last column was used to write the school's name and write down our full schedule. The 2nd page was used to continue writing about our classes and what happens in them.


Thursday, November 7, 2013

2nd Marking Period

Assignment 11


  • In this assignment, we created a poster for a science night in our school using what we learned last marking period. We opened a new document and created the tittle for our poster by using one of the photoshop text effect that we learned. I used the glass effect text. Then, we saved it as an image and put it on another new document in which we created our poster on. To create our poster, we mentioned when and where the science night is happening and we explained what STEM is, which is the program that created the science night. After we added our description, we then pasted 4 pictures that relate to science and STEM and saved it.

Assignment 12

 
  • In this assignment we learned how to texture with layer modes by using clipping masks to constrain the visibility of one layer under it. The guys picked a suit and the girls picked a dress and we chose whatever texture we wanted to. I used the magnetic lasso around the dress and then copy merged. I opened the texture file and placed it over the dress. I clipped the layer, changed the blending mode to color dodge, and finally adjusted the opacity to make the dress look more real.

Assignment 13

  • Using what we learned on assignment 12, we created a mimic poster of the official poster for Food Bank NYC's EATWISE program for teens. We changed any junk food to a healthy snack by using the magnetic lasso and clipping both the junk food and the healthy snack together. Then we saved that into a picture and pasted it on the poster we are making. We added a heading and a subheading and added a disclaimer for the use of the NYC Food Bank logo. Lastly, we added an outer glow to make it look like a real poster from NYC Food Bank.

 Assignment 14

  • This assignment was assigned during Halloween so we decided to do a little something for that day. We took a picture of a regular pumpkin and turned it into a jack o' lantern. We used the pen tool and the brush tool to draw out the face of the jack o' lantern. We went to blending options and changed the inner shadow, the outer glow, inner glow, a gradient overlay and stroke. Then, we added another layer and picked the brush tool and added some kind of glow that made it seem as if it was coming out of the pumpkin. Finally, we added a text layer saying it's our jack o' lantern.  

 Assignment 15A

     
  • In this assignment we created a painted effect look by overlaying a picture of a brick wall and a flag. We created a new file and added the picture of the brick wall. Then we opened the picture of the flag and put them both together. We copied the brick layer and added a filter called Gaussian blur. We saved the file as it was and continued. We clicked on the flag layer and added a filter by clicking distort and then we clicked on displace. We changed the vertical and horizontal scale and added the file that we saved earlier. We changed the blending option of the brick copy to hard light and lastly changed the opacity to 80%.

Assignment 15B


  • In this assignment, we applied the same effect from the last assignment on to our face. When we finished putting the flag over our face, we used the erasing tool to erase part of the flag that wasn't on our face to make it look as if we actually painted on ourselves. Then we used the smudge tool to smudge the paint on the outer part of our face to make it look more real. Finally, we took the orignal photo and placed by the corner of assignment to show the difference.   

 Assignment 16

 
  • In this assignment, we used Smart Filters to create a motion image. We opened a new document of a train as smart object and went to filter, blur, motion blur and we changed the pixles to 25.We then picked the brush tool and selected a soft-edge brush and made sure the default foreground color was black. We then used the brush tool to paint over where we don't want the filter to be applied to, which is the train. Finally, we created a canvas to fit both pictures, one on top of the other, to show the difference between them.  

Assignment 17

 
  • In this assignment, we used the Quick Mask which lets us create a mask on a specific area that we can edit or paint with black or white colors. We chose an image of a someone smile and changed the color of the teeth by changing the opacity of it. We selected the smile by clicking on the quick mask button and painting over it which created a red mask over the smile. Then while it was selected, we changed the opacity either higher or lower which changed the color of his teeth.

Assignment 18

  • In this assignment, we added a soft-focus effect to make the potrait glow. We chose an image of a person, I chose James Marsden, and duplicated the layer and added smart filter to the new layer.We clicked on filter, blur and chose Gaussian blur. We changed the radius blur to 5 and clicked ok. Then we changed the image to screen which made the image bright. We added a layer mask and then clicked on the brush tool and picked on a soft-edge brush that was the right size for the eyes and lips. Then we painted over the eyes and lips to make them stand out by clicking on the airbrush tool and changing the opacity to 40%. Finally, we changed the canvas so both the original and new image fit so one can see the difference between both of them.

Assignment 19 (uncompleted)


Assignment 20 (uncompleted)